
Encoders are digital circuits that are used to encode data, and convert human understandable data to machine understandable data.
A simple example is ASCII encoder, which converts the key pressed on the key board to its corresponding, machine understandable, code.
Encoders are very useful in digital circuits, from pocket calculators to keyboards and much more.
Here we are going to build a simple “priority encoder” using Verilog.

| D7 | D6 | D5 | D4 | D3 | D2 | D1 | D |
|---|---|---|---|---|---|---|---|
| 1 | 0 | 0 | 0 | 0 | 0 | 0 | 0 |
| 0 | 1 | 0 | 0 | 0 | 0 | 0 | 0 |
| 0 | 0 | 1 | 0 | 0 | 0 | 0 | 0 |
| 0 | 0 | 0 | 1 | 0 | 0 | 0 | 0 |
| 0 | 0 | 0 | 0 | 1 | 0 | 0 | 0 |
| 0 | 0 | 0 | 0 | 0 | 1 | 0 | 0 |
| 0 | 0 | 0 | 0 | 0 | 0 | 1 | 0 |
| 0 | 0 | 0 | 0 | 0 | 0 | 0 | 1 |
| Y2 | Y1 | Y0 |
|---|---|---|
| 1 | 1 | 1 |
| 1 | 1 | 0 |
| 1 | 0 | 1 |
| 1 | 0 | 0 |
| 0 | 1 | 1 |
| 0 | 1 | 0 |
| 0 | 0 | 1 |
| 0 | 0 | 0 |
The above is the respective outputs produced by the encoder when any one of the lines is kept high.
The above design can generate error when there are more than one lines that are kept high. This is the major drawback of a simple encoder.
In order to prevent this error, we can introduce priority of inputs. This can be achieved if we discard a Logic High input after one is received in the priority order.
This can be simply understood by redrawing the Truth Table.
| D7 | D6 | D5 | D4 | D3 | D2 | D1 | D0 |
|---|---|---|---|---|---|---|---|
| 1 | X | X | X | X | X | X | X |
| 0 | 1 | X | X | X | X | X | X |
| 0 | 0 | 1 | X | X | X | X | X |
| 0 | 0 | 0 | 1 | X | X | X | X |
| 0 | 0 | 0 | 0 | 1 | X | X | X |
| 0 | 0 | 0 | 0 | 0 | 1 | X | X |
| 0 | 0 | 0 | 0 | 0 | 0 | 1 | X |
| 0 | 0 | 0 | 0 | 0 | 0 | 0 | 1 |
| Y2 | Y1 | Y0 |
|---|---|---|
| 1 | 1 | 1 |
| 1 | 1 | 0 |
| 1 | 0 | 1 |
| 1 | 0 | 0 |
| 0 | 1 | 1 |
| 0 | 1 | 0 |
| 0 | 0 | 1 |
| 0 | 0 | 0 |
This above method has an advantage over the simple encoder, that it gives priority order to the input lines. Thus, if more than two lines are high, only the one with highest priority will be considered.
Now writing Code for this is fairly simple:
Code :
// the-tech-social
// Priority Encoder
// this is a 8 to 3 decoder => with priority enabled
module priority_encoder(
    input wire[7:0] in, // input given
    input wire enable, //chip enable => active high
    output reg [2:0] y // encoded output
    );

    always@ * begin
       if (!enable)
         y[2:0] = 4'h0;
       else
         casez(in)
            8'b1???????: y = 3'b111; // d7
            8'b01??????: y = 3'b110; // d6
            8'b001?????: y = 3'b101; // d5
            8'b0001????: y = 3'b100; // d4
            8'b00001???: y = 3'b011; // d3
            8'b000001??: y = 3'b010; // d2
            8'b0000001?: y = 3'b001; // d1
            8'b00000001: y = 3'b000; // d0
            default: y = 3'b111;     // default is highest priority => d7
	 endcase
    end
endmodule
You can see that I have also added an active high enable in the above code for chip enable. So, when the enable is low no output is received.
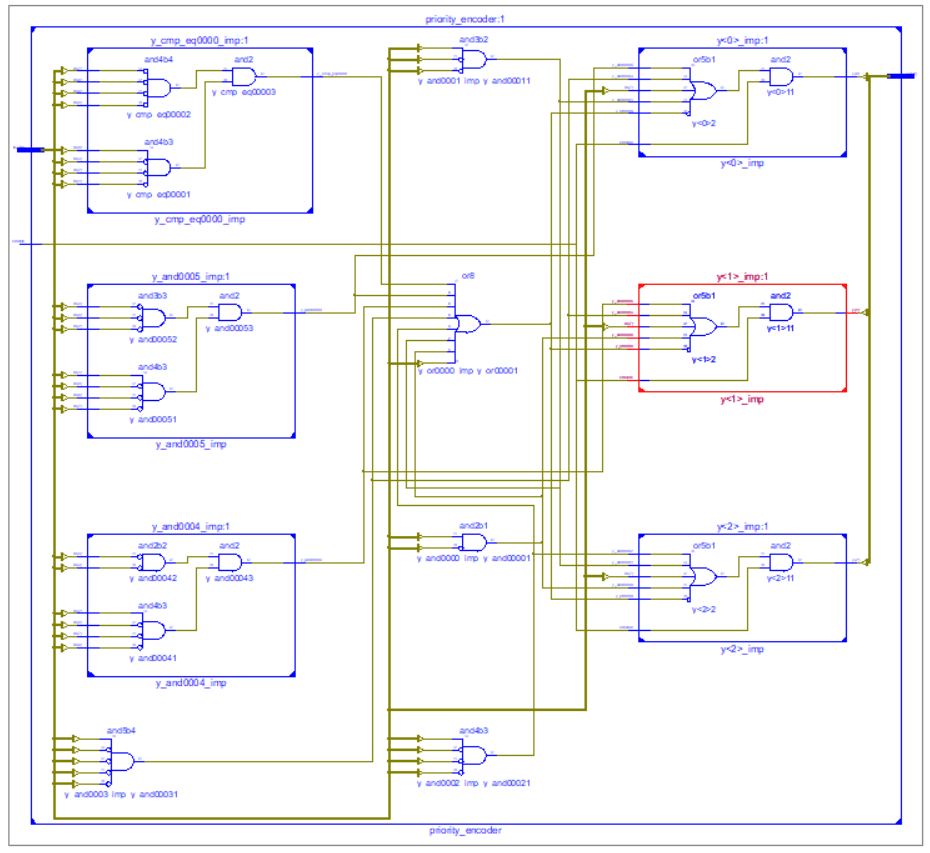
RTL view:
The following RTL view is generated using this code,
Testbench:
Yes, after RTL generation we generally try to figure out a testbench. But since we have already tried a decoder, why not try to link these together.
If you are wondering where is the decoder, please take a look here: https://techno10.tech.blog/2020/12/18/decoder-using-verilog/
Now then, if we need to test the encoder, we can give the inputs at the encoder end and when the output is generated, we can get these to connect to the inputs of the decoder, which in turn will generate the input that we first choose to give in.
What I mean can be shown using the below code:
// the-tech-social
// Test_encoder module
// input => encoder => decoder => output
module Test_encoder (
    input wire[7:0] in, // input given
    input wire enable, //chip enable => active high
    output wire [7:0] out
);

    wire [2:0] inter;
    // 8to3 encoder module instantiation
    priority_encoder e1(.in(in), .enable(enable), .y(inter));
    // 3to8 decoder module instantiation
    Decoder d1(.din(inter), .enable(~enable), .dout(out));

endmodule
We can see that the intermediate wire “inter” that stores the value of the encoder is then given as the input to the decoder. Also, the enable is connected “inverted” with the decoder since it is active low and “normally” with the encoder since it is active high.
Just remember that we have used 8to3 encoder and 3to8 decoder here to achieve the objective.
This can also be seen in the below RTL view of the module.

Now we can write a test bench to this and expect the output to be the input given as simple as that.
Code for test bench:
// the-tech-social
// Test_encoder_tb
// Testbench for Test_encoder
module Test_encoder_tb;
    reg [7:0] in;
    reg enable;
    wire [7:0] out;

    // initializing the design
    Test_encoder t1(in, enable, out);

    integer i;

    initial enable = 1'b1;

    initial begin
        in = 00000001;
        i = 0;
        #100;
        for (i = 0; i < 8; i=i+1) begin
           in = in<<1;
           #100;
        end
    end
endmodule
This sure is fun, and we can see the output following the input in the stimulation waveform.
Stimulation:
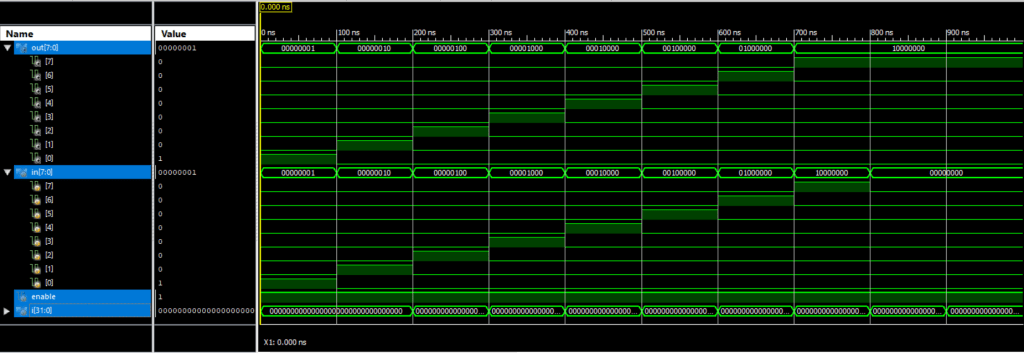
Here, we can observe that the last input is ‘00000000’ yet the output is ‘10000000’. This is something I will let you figure out by yourself, and fix so that you can have a proper understanding of the encoder and decoder that we have used here.
So, now we have a encoder and a circuit to test its functionality.
Great!!!😎😎
